2 - 一个周末搞定光追Part2
开始学习大名鼎鼎的光追三部曲系列中的:Ray Tracing in One Weekend!希望我能坚持下去吧。
抗锯齿
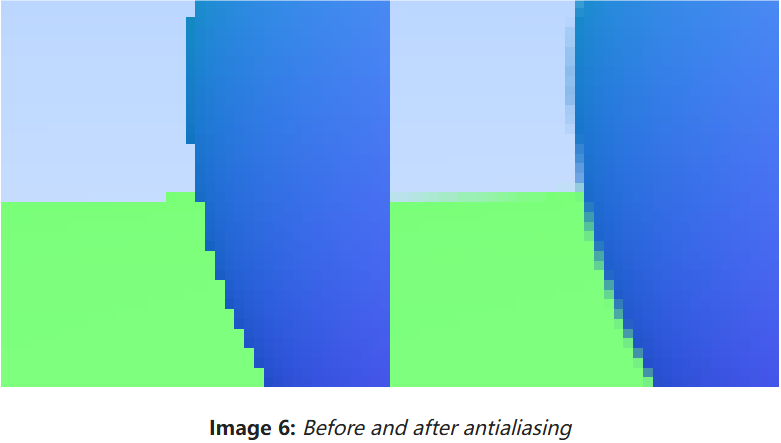
如果继续放大图片,会发现锯齿状的瑕疵影响观感,因此需要进行抗锯齿操作。我们需要采样光打到像素中心的周围几格像素,然后整合到像素中心。
随机数生成工具
在C++11之前,可以使用std::rand()函数生成随机数:
inline double random_double()
{
    return std::rand() / (RAND_MAX + 1.0);
}

inline double random_double(double min, double max)
{
    return min + (max - min) * random_double();
}
前者生成[0,1)内的随机实数,后者生成[min, max)内的随机实数。
C++11提供随机数生成库<ramdom>,用它可以生成标准的随机数:
inline double random_double()
{
    static std::uniform_real_distribution<double> distribution(0.0, 1.0);
    static std::mt19937 generator;
    return distribution(generator);
}
这些函数将被写入rtweekend.h的工具函数中。
生成多重采样的像素
我们将通过随机采样像素周围的几个像素取均值,生成具有多重采样的像素。
首先,需要更新write_color()以考虑我们以后的更改,这里写入的颜色将是随机采样后的均值,范围可能会超,因此要限制到[0, 1]。
在Interval类中添加帮手函数clamp()如下:
double clamp(double x) const
{
    if (x < min) return min;
    if (x > max) return max;
    return x;
}
在write_color()中添加Interval类实例,然后应用clamp()方法:
inline void writeColor(std::ostream& out, const Color& pixel_color) {
    auto r = pixel_color.x();
    auto g = pixel_color.y();
    auto b = pixel_color.z();

    // 将属于[0, 1]的RGB分量变换到[0, 255]上
    static const Interval intensity(0.000, 0.999);
    int rByte = static_cast<int>(256 * intensity.clamp(r));
    int gByte = static_cast<int>(256 * intensity.clamp(g));
    int bByte = static_cast<int>(256 * intensity.clamp(b));

    // 写到输出流out中
    out << rByte << ' ' << gByte << ' ' << bByte << '\n';
}
然后需要更新Camera类,定义一个新函数get_ray(i, j),它将为每个像素生成不同的采样,并通过帮手函数sample_square()去进行采样工作。修改后的Camera类如下:
#pragma once

#include "../rtweekend.h"
#include "../ray/hittable.hpp"

class Camera
{
public:
    ...
    int samples_per_pixel = 10;            // 每像素采样数, 即SPP

    ...
    void render(const Hittable& world)
    {
        std::cout << std::format("P3\n{} {}\n255\n", imgWidth, imgHeight);
        for (int j = 0; j < imgHeight; ++j)
        {
            for (int i = 0; i < imgWidth; ++i)
            {
                Color final_pixel_color(0, 0, 0);
                for (int sampleCnt = 0; sampleCnt < samples_per_pixel; ++sampleCnt)
                {
                    Ray r = get_ray(i, j);
                    final_pixel_color += ray_color(r, world);
                }
                writeColor(std::cout, pixel_sample_scale * final_pixel_color);
            }
        }
    }

private:
    ...
    double pixel_sample_scale;            // spp / 1
    ...

    void initialize()
    {
        ...
        pixel_sample_scale = 1.0 / samples_per_pixel;
        ...
    }

    // 随机生成一条从摄像机原点出发, 到达像素(i,j)周围的光线
    Ray get_ray(int i, int j) const
    {
        Vec3 offset = sample_square();
        Point3 pixel_sample = pixel00_pos + ((i + offset.x()) * pixel_delta_u) + ((j + offset.y()) * pixel_delta_v);

        Point3 ray_origin = center;
        Vec3 ray_direction = pixel_sample - ray_origin;

        return Ray(ray_origin, ray_direction);
    }

    // 返回位于[-.5,-.5]-[+.5,+.5]间的随机2D偏移量
    Vec3 sample_square() const
    {
        return Vec3(random_double() - 0.5, random_double() - 0.5, 0);
    }

    Color ray_color(const Ray& r, const Hittable& world) const {...}
};
看看抗锯齿前后对比:
漫反射材质
接下来可以创建一些现实中的材质了,我们将从漫反射材质开始。
简单漫反射模型
对于漫反射材质的物体,反射光线的方向是随机的,例如向两个漫反射表面发射三束光可能会发生如下反射:
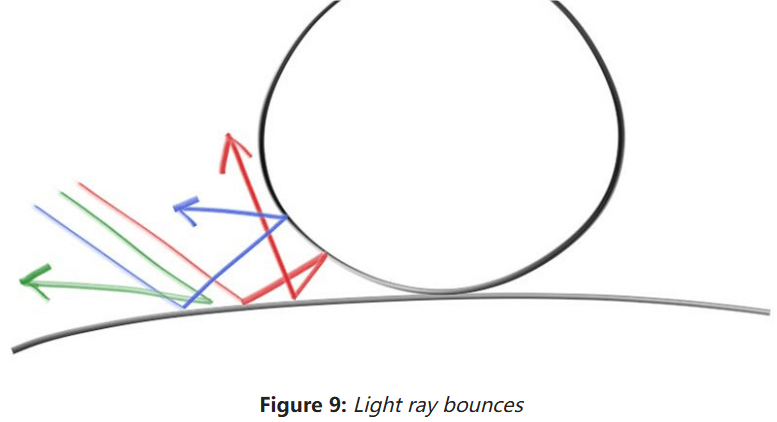
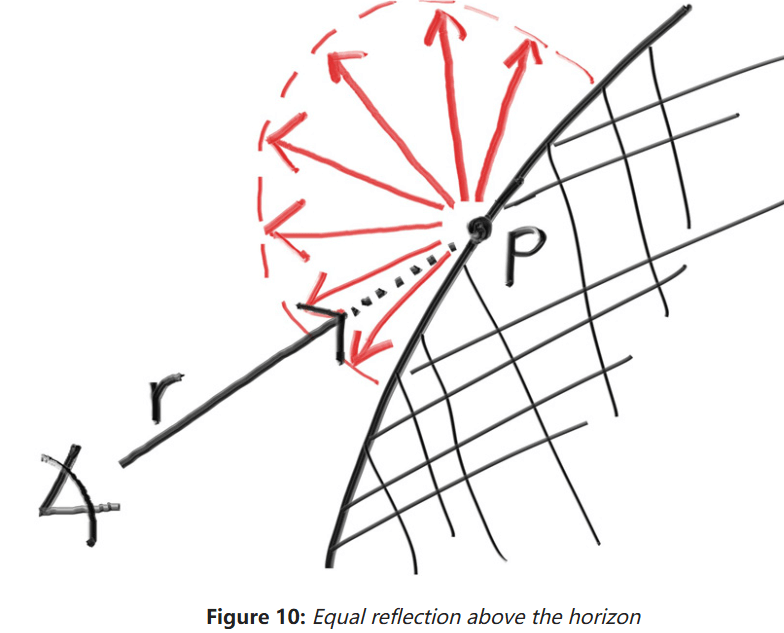
实际上,光线还可能被吸收而不是反射。表面越暗,光越有可能被吸收。这里准备一个简单的漫反射模型,光线反射至各角度的可能性均等:
接下来在Vec3类中添加一些生成随机向量的工具方法:
// 生成随机数
static Vec3 random()
{
    return Vec3(random_double(), random_double(), random_double());
}

static Vec3 random(double min, double max)
{
    return Vec3(random_double(min, max), random_double(min, max), random_double(min, max));
}
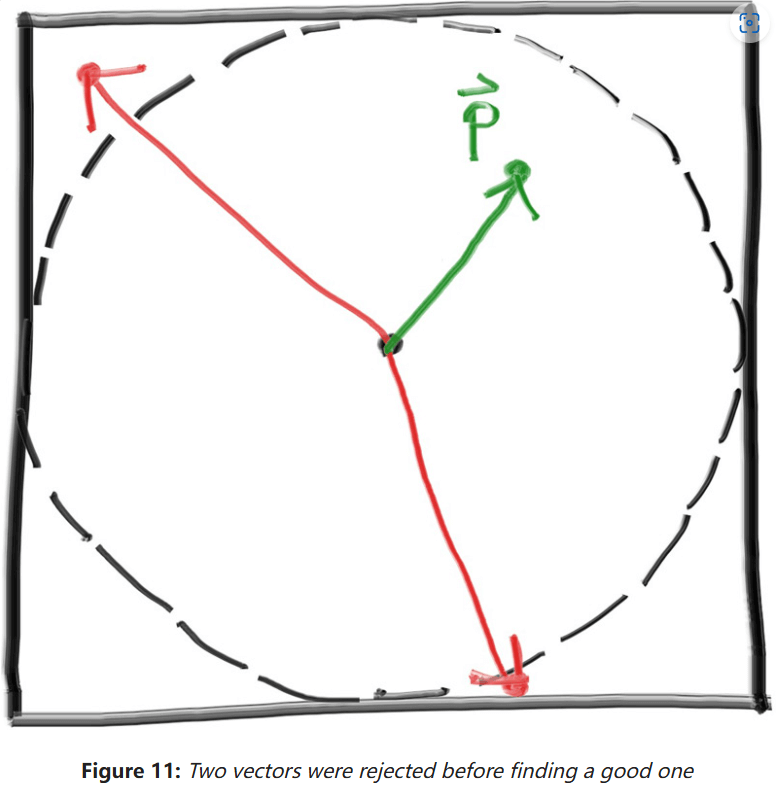
然后我们需要知道如何只让反射光线反射到表面以上半球区域。这里采用简单的“拒绝”方法,只需重复随机生成采样,拒绝到不符要求的采样,直到生成的采样符合要求。其中最简单的方法就是:
- 在单位球里随机生成一个向量;
- 标准化这个向量;
- 如果这个向量朝向错误的半球,反转它即可。
根据这个方法,我们在单位立方体里随机生成一个向量,如果向量在单位球外就抛弃:
在Vec3类中添加的工具函数如下:
inline Vec3 random_in_unit_sphere()
{
    while (true)
    {
        Vec3 p = Vec3::random(-1, 1);
        if (p.lengthSquared() < 1)
        {
            return p;
        }
    }
}
然后标准化这个向量:
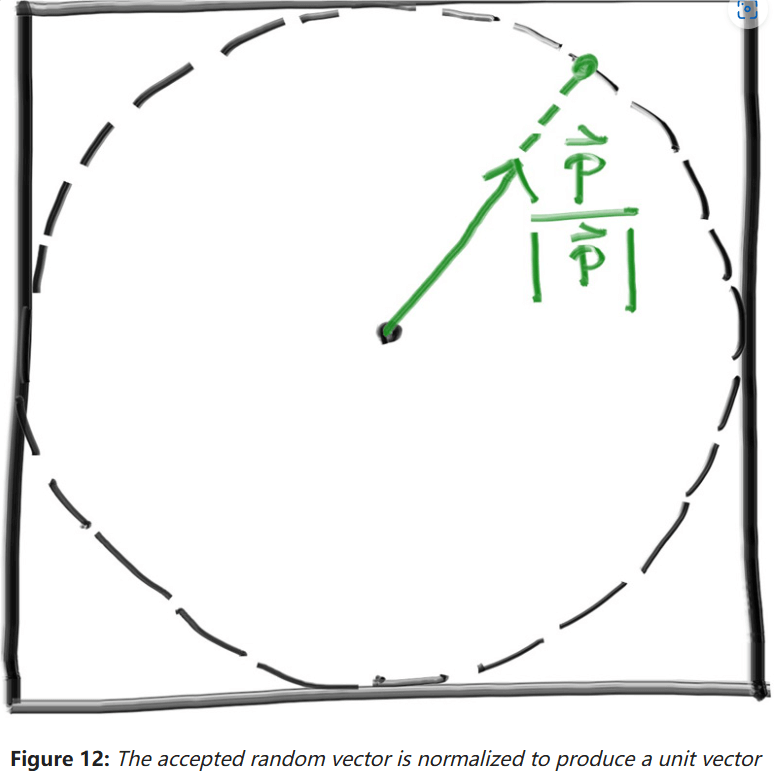
在Vec3类中添加的工具函数如下:
inline Vec3 random_unit_vector()
{
    return unitVector(random_in_unit_sphere());
}
最后需要判断它的朝向是否正确,可以和表面法向量比较:
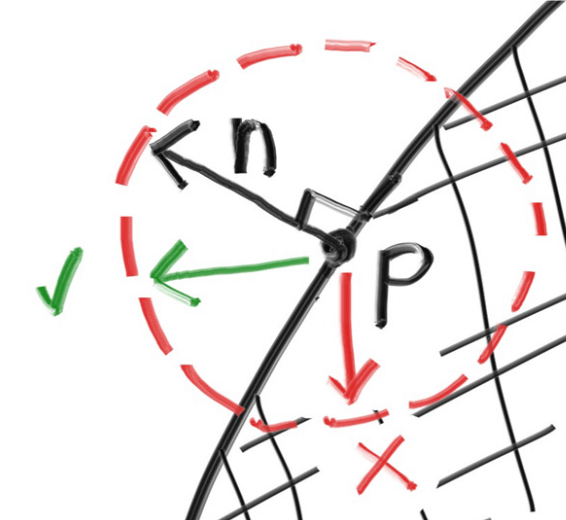
可以根据两向量点乘的结果判断朝向是否正确,在Vec3中添加工具函数如下:
inline Vec3 random_on_hemisphere(const Vec3& normal)
{
    Vec3 on_unit_sphere = random_unit_vector();
    if (dot(on_unit_sphere, normal) > 0.0)
    {
        return on_unit_sphere;
    }
    return -on_unit_sphere;
}
如果光线击中一个材质反弹后能保留100%的颜色,那么这个光就是白色的。如果不保留它本身的颜色,那么就是黑色的。这里我们保留50%的颜色,修改ray_color:
Color ray_color(const Ray& r, const Hittable& world) const
{
    // vvvvvvvvvvvvvvvvvvvvvvvvvvvvvvvv 和光线相交物体 vvvvvvvvvvvvvvvvvvvvvvvvvvvvvvvvv
    HitRecord rec;
    if (world.hit(r, Interval(0, infinity), rec))
    {
        // 生成随机反射方向
        Vec3 direction = random_on_hemisphere(rec.normal);
        // 开始下一轮反射
        return 0.5 * ray_color(Ray(rec.position, direction), world);
    }
    // ^^^^^^^^^^^^^^^^^^^^^^^^^^^^^^^^ 和光线相交物体 ^^^^^^^^^^^^^^^^^^^^^^^^^^^^^^^^^

    // vvvvvvvvvvvvvvvvvvvvvvvvvvvvvvvv 背景 vvvvvvvvvvvvvvvvvvvvvvvvvvvvvvvv
    Vec3 dir = r.direction();
    // a in [-1, 1] -> a in [0, 1]
    double a = 0.5 * (dir.y() + 1.0);
    // 线性混合
    return (1.0 - a) * Color(1.0, 1.0, 1.0) + a * Color(0.5, 0.7, 1.0);
    // ^^^^^^^^^^^^^^^^^^^^^^^^^^^^^^^^ 背景 ^^^^^^^^^^^^^^^^^^^^^^^^^^^^^^^^
}
效果如下:

限制子光线的数量
在ray_color()中我们还没设置递归退出条件,这将导致程序运行时间过长。于是修改Camera类,添加递归退出条件:
#pragma once

#include "../rtweekend.h"
#include "../ray/hittable.hpp"

class Camera
{
    public:
    double aspectRadio = 1.0;       // 图像的宽高比
    int imgWidth = 100;             // 图像宽度
    int samples_per_pixel = 10;     // 每像素采样数, 即SPP
    int max_depth = 10;             // 光线的最大弹射次数

    void render(const Hittable& world)
    {
        initialize();

        std::cout << std::format("P3\n{} {}\n255\n", imgWidth, imgHeight);
        for (int j = 0; j < imgHeight; ++j)
        {
            for (int i = 0; i < imgWidth; ++i)
            {
                Color final_pixel_color(0, 0, 0);
                for (int sampleCnt = 0; sampleCnt < samples_per_pixel; ++sampleCnt)
                {
                    Ray r = get_ray(i, j);
                    final_pixel_color += ray_color(r, max_depth, world);
                }
                writeColor(std::cout, pixel_sample_scale * final_pixel_color);
            }
        }
    }

    private:
    int imgHeight;                    // 图像高度
    double pixel_sample_scale;        // spp / 1
    Point3 center;                    // 相机位置
    Point3 pixel00_pos;               // 像素(0, 0)的位置
    Vec3 pixel_delta_u;               // 定位像素用的辅助向量
    Vec3 pixel_delta_v;

    void initialize()
    {
        imgHeight = static_cast<int>(imgWidth / aspectRadio);
        imgHeight = (imgHeight < 1) ? 1 : imgHeight;                // 确保高度至少为1

        center = Point3(0, 0, 0);

        pixel_sample_scale = 1.0 / samples_per_pixel;

        // 相机设定
        double focalLength = 1.0;                                    // 焦距

        // 视口设定
        double viewportHeight = 2.0;
        double viewportWidth = viewportHeight * static_cast<double>(imgWidth) / imgHeight;

        // 4个辅助向量
        Vec3 viewport_u = Vec3(viewportWidth, 0, 0);
        Vec3 viewport_v = Vec3(0, -viewportHeight, 0);
        pixel_delta_u = viewport_u / imgWidth;
        pixel_delta_v = viewport_v / imgHeight;

        // 计算第一个像素位置
        Point3 viewport_upper_left = center - Point3(0, 0, focalLength) - viewport_u / 2 - viewport_v / 2;
        pixel00_pos = viewport_upper_left + 0.5 * (pixel_delta_u + pixel_delta_v);
    }

    // 随机生成一条从摄像机原点出发, 到达像素(i,j)周围的光线
    Ray get_ray(int i, int j) const
    {
        Vec3 offset = sample_square();
        Point3 pixel_sample = pixel00_pos + ((i + offset.x()) * pixel_delta_u) + ((j + offset.y()) * pixel_delta_v);

        Point3 ray_origin = center;
        Vec3 ray_direction = pixel_sample - ray_origin;

        return Ray(ray_origin, ray_direction);
    }

    // 返回位于[-.5,-.5]-[+.5,+.5]间的随机2D偏移量
    Vec3 sample_square() const
    {
        return Vec3(random_double() - 0.5, random_double() - 0.5, 0);
    }

    Color ray_color(const Ray& r, int depth, const Hittable& world) const
    {
        // 递归退出
        if (depth <= 0)
        {
            return Color(0, 0, 0);
        }

        // vvvvvvvvvvvvvvvvvvvvvvvvvvvvvvvv 和光线相交物体 vvvvvvvvvvvvvvvvvvvvvvvvvvvvvvvvv
        HitRecord rec;
        if (world.hit(r, Interval(0, infinity), rec))
        {
            // 生成随机反射方向
            Vec3 direction = random_on_hemisphere(rec.normal);
            // 开始下一轮反射
            return 0.5 * ray_color(Ray(rec.position, direction), depth - 1, world);
        }
        // ^^^^^^^^^^^^^^^^^^^^^^^^^^^^^^^^ 和光线相交物体 ^^^^^^^^^^^^^^^^^^^^^^^^^^^^^^^^^

        // vvvvvvvvvvvvvvvvvvvvvvvvvvvvvvvv 背景 vvvvvvvvvvvvvvvvvvvvvvvvvvvvvvvv
        Vec3 dir = r.direction();
        // a in [-1, 1] -> a in [0, 1]
        double a = 0.5 * (dir.y() + 1.0);
        // 线性混合
        return (1.0 - a) * Color(1.0, 1.0, 1.0) + a * Color(0.5, 0.7, 1.0);
        // ^^^^^^^^^^^^^^^^^^^^^^^^^^^^^^^^ 背景 ^^^^^^^^^^^^^^^^^^^^^^^^^^^^^^^^
    }
};
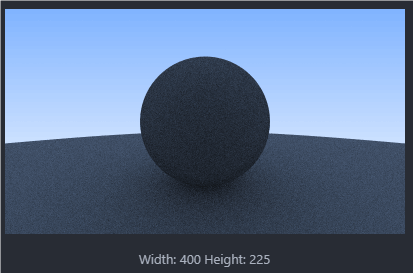
摄像机的参数设置如下:
cam.aspectRadio = 16.0 / 9.0;
cam.imgWidth = 400;
cam.samples_per_pixel = 100;
cam.max_depth = 50;
得到的结果如下:
修复阴影失真问题
由于浮点数运算存在误差,反弹光线的原点会出现偏移,使得球表面上也产生”阴影“。这里直接修改ray_color(),限制光线打到物体的判断范围即可:
HitRecord rec;
if (world.hit(r, Interval(0.001, infinity), rec))
{
    // 生成随机反射方向
    Vec3 direction = random_on_hemisphere(rec.normal);
    // 开始下一轮反射
    return 0.5 * ray_color(Ray(rec.position, direction), depth - 1, world);
}
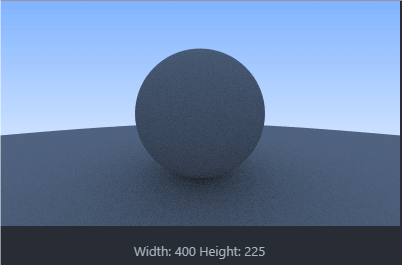
修复阴影失真(Shadow Acne)问题后的结果如下:
Lambertian反射
接下来试试更准确的漫反射模型,Lambertian分布模型。这个模型将反射光线以的比例散射,其中是反射光线和表面法线的夹角。也就是说反射光更容易朝靠近表面法线的方向散射,而不容易朝远离表面法线的方向散射,这种反射模型比之前的更现实。
我们可以通过在表面法向量处添加一个随机单位向量以创建该反射分布。对于着色点,着色点上的表面法向量,由于有内外表面区分,只有两个单位球和这个表面相切。这两个单位球一个放在方向,另一个放在方向。对于方向的球,球心是,也就是在外表面的球,如下图:
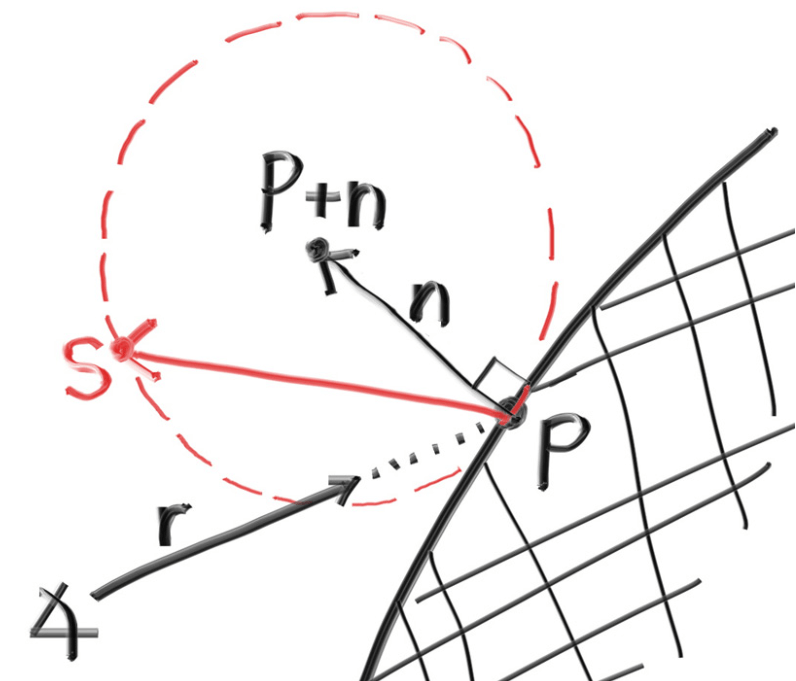
我们想要在这个单位球上取随机点,然后在方向上反射光线,修改ray_color()如下:
HitRecord rec;
if (world.hit(r, Interval(0.001, infinity), rec))
{
    // Lambert反射模型 (内外表面单位球均考虑)
    Vec3 direction = rec.normal + random_unit_vector();
    // 只考虑外表面单位球: Vec3 direction = rec.normal + random_on_hemisphere(rec.normal);
    // 开始下一轮反射
    return 0.5 * ray_color(Ray(rec.position, direction), depth - 1, world);
}
结果如下(右边是内外表面单位球均考虑):
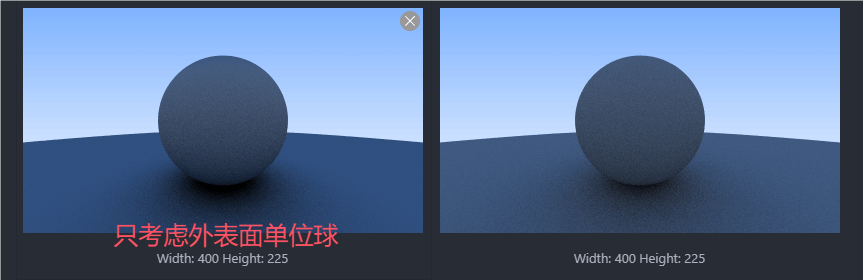
可以发现新反射模型更加强调阴影和天空的反射,看起来更舒服一些。
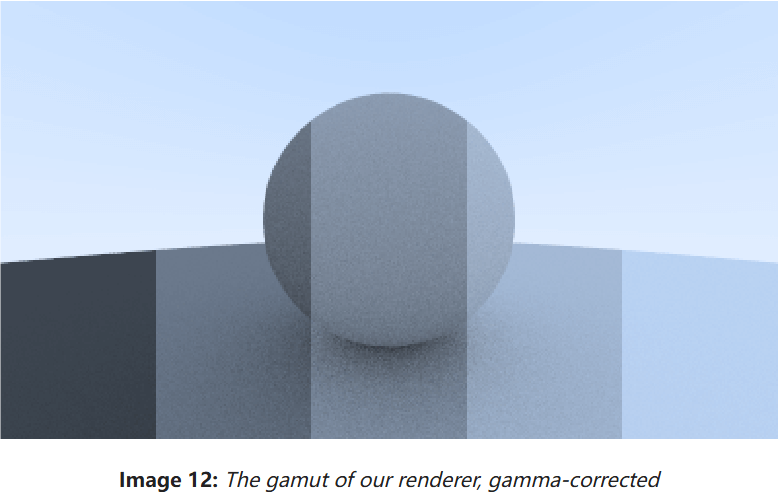
Gamma校正
首先看看让光保留10%,30%,50%,70%,90%的结果:
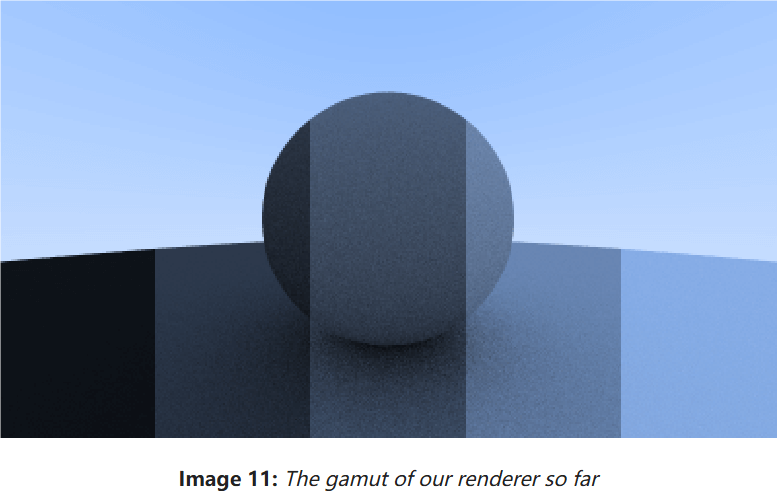
可以发现中间50%的还是太暗了,这是因为几乎所有电脑程序都假设这张图已经被Gamma校正过了。没有经过变换的图片数据应该存在线性空间,经过变换的图片数据应该存在Gamma空间,这里直接把线性空间的数据当成Gamma空间的了,因此图片会偏暗。
接下来将图片的数据从线性空间变换到Gamma空间。这里使用”gamma 2“的逆变换,在color.hpp中添加相关工具函数,并修改write_color():
inline double linear_to_gamma(double linear_component)
{
    if (linear_component > 0)
    {
        return std::sqrt(linear_component);
    }
    return 0;
}

inline void writeColor(std::ostream& out, const Color& pixel_color)
{
    auto r = pixel_color.x();
    auto g = pixel_color.y();
    auto b = pixel_color.z();

    // 将数据从线性空间变换到Gamma空间
    r = linear_to_gamma(r);
    g = linear_to_gamma(g);
    b = linear_to_gamma(b);

    // 将属于[0, 1]的RGB分量变换到[0, 255]上
    static const Interval intensity(0.000, 0.999);
    int rByte = static_cast<int>(256 * intensity.clamp(r));
    int gByte = static_cast<int>(256 * intensity.clamp(g));
    int bByte = static_cast<int>(256 * intensity.clamp(b));

    // 写到输出流out中
    out << rByte << ' ' << gByte << ' ' << bByte << '\n';
}
然后渲染一下,整体变亮了:
金属材质
接下来开始让物体拥有金属材质,不过在此之前先定义一个材质的抽象类,它需要完成以下两件事情:
- 产生一个散射光(或者说吸收了入射光)
- 如果发生散射,应说明有多少光被减弱。
抽象类Material如下:
#pragma once

#include "../rtweekend.h"

class HitRecord;

class Material
{
public:
    virtual ~Material() = default;

    virtual bool scatter(const Ray& r_in, const HitRecord& rec, Color& attenuation, Ray& scattered) const
    {
        return false;
    }
};
描述光线和物体求交的数据结构
就是我们之前写的HitRecord类,在这里添加Material类的声明,然后在HitRecord中添加材质类的共享智能指针:
// 不添加定义, 避免循环引用
class Material;

class HitRecord
{
public:
    Point3 position;
    Vec3 normal;
    shared_ptr<Material> material;
    double t;
    bool front_face;


    void set_face_normal(const Ray& r, const Vec3& outward_normal)
    {
        // 注意: 总认为outward_normal是单位向量
        front_face = dot(r.direction(), outward_normal) < 0.0;
        normal = front_face ? outward_normal : -outward_normal;
    }
};
当入射光线打到物体表面时,在HitRecord中的材质指针将获取并赋值为物体表面的材质,之后ray_color()会访问材质指针,调用scatter()方法以了解哪些光应该被散射。这需要我们在Sphere类中进行一些修改:
class Sphere : public Hittable
{
public:
    Sphere(const Point3& center, double radius)
        : center(center), radius(std::fmax(0, radius))
    {
        // TODO: 在这里初始化材质指针 material
    }

    bool hit(const Ray& r, Interval ray_t, HitRecord& rec) const override
    {
        ...
        // 记录相交信息
        rec.t = root;
        rec.position = r.at(rec.t);
        Vec3 outward_normal = (rec.position - center) / radius;    // 利用定义简化法线计算
        rec.set_face_normal(r, outward_normal);
        rec.material = material;

        return true;
    }

private:
    Point3 center;
    double radius;
    shared_ptr<Material> material;
};
为光散射和反射建模
这里会用到albedo项(反照率)描述材质的反射率,它和材质颜色不一样,也能随入射光方向变化。
Lambertian漫反射用的反射率散射并削弱部分光,也有可能以的概率不散射光。这里我们简单一点,让光总是被散射。实现Lambertian材质类如下:
#pragma once

#include "material.hpp"

class Lambertian : public Material
{
public:
    Lambertian(const Color& albedo) : albedo(albedo) {}

    bool scatter(const Ray& r_in, const HitRecord& rec, Color& attenuation, Ray& scattered) const override
    {
        // Lambert反射模型 (内外表面单位球均考虑)
        Vec3 scatter_direction = rec.normal + random_unit_vector();
        // 只考虑外表面单位球: Vec3 direction = rec.normal + random_on_hemisphere(rec.normal);
        scattered = Ray(rec.position, scatter_direction);
        attenuation = albedo;
        return true;
    }

private:
    Color albedo;
};
实际上也能以的概率散射一些光,那么attenuation就得是。
考虑刚刚写的scatter_direction,发现结果有概率为0向量(随机生成了一个-rec.normal),出现边界问题,我们还得处理它。在Vec3类中添加如下方法:
bool near_zero() const
{
    // 如果该向量很接近0就返回true
    double s = 1e-8;
    return ((std::fabs(e[0]) < s) && (std::fabs(e[1]) < s) && (std::fabs(e[2]) < s));
}
然后改一下Lambertian类:
bool scatter(const Ray& r_in, const HitRecord& rec, Color& attenuation, Ray& scattered) const override
{
    // Lambert反射模型 (内外表面单位球均考虑)
    Vec3 scatter_direction = rec.normal + random_unit_vector();
    // 只考虑外表面单位球: Vec3 direction = rec.normal + random_on_hemisphere(rec.normal);

    // 处理边界问题
    if (scatter_direction.near_zero())
    {
        scatter_direction = rec.normal;
    }

    scattered = Ray(rec.position, scatter_direction);
    attenuation = albedo;
    return true;
}
镜面光反射
对于金属材质,它不会发生漫反射,而会发生如下图所示的镜面反射:
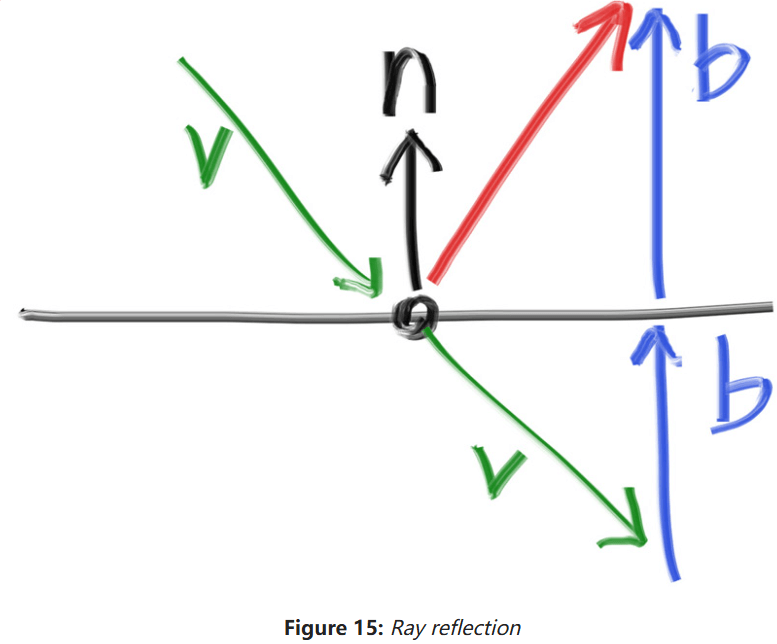
可以发现反射光的方向就是。其中,是单位向量,而不一定是。为了得到向量,需要将投影到上,也就是(不是单位向量还要除以它的长度),最后取反方向即可。在Vec3类中添加如下函数:
// 返回入射方向v,单位向量n的镜面反射向量
inline Vec3 reflect(const Vec3& v, const Vec3& n)
{
    // 点乘结果是大小, 因此还要乘个向量n
    return v - 2 * dot(v, n) * n;
}
然后就能再新建一个Metal材质类了:
#pragma once

#include "material.hpp"

class Metal : public Material
{
public:
    Metal(const Color& albedo) : albedo(albedo) {}

    bool scatter(const Ray& r_in, const HitRecord& rec, Color& attenuation, Ray& scattered) const
    {
        Vec3 reflected_direction = reflect(r_in.direction(), rec.normal);
        scattered = Ray(rec.position, reflected_direction);
        attenuation = albedo;
        return true;
    }

private:
    Color albedo;
};
最后修改ray_color(),以适配我们刚刚写的类:
// vvvvvvvvvvvvvvvvvvvvvvvvvvvvvvvv 和光线相交物体 vvvvvvvvvvvvvvvvvvvvvvvvvvvvvvvvv
HitRecord rec;
if (world.hit(r, Interval(0.001, infinity), rec))
{
    Ray scattered;
    Color attenuation;
    if (rec.material->scatter(r, rec, attenuation, scattered))
    {
        return attenuation * ray_color(scattered, depth - 1, world);
    }
    return Color(0, 0, 0);
}
// ^^^^^^^^^^^^^^^^^^^^^^^^^^^^^^^^ 和光线相交物体 ^^^^^^^^^^^^^^^^^^^^^^^^^^^^^^^^^
别忘了Sphere类中的TODO:
Sphere(const Point3& center, double radius, shared_ptr<Material> material)
    : center(center), radius(std::fmax(0, radius)), material(material) {}
添加金属球
终于能在场景里添加金属球了:
// main.cpp
// 材质设定
auto material_ground = make_shared<Lambertian>(Color(0.8, 0.8, 0.0));
auto material_center = make_shared<Lambertian>(Color(0.1, 0.2, 0.5));
auto material_left = make_shared<Metal>(Color(0.8, 0.8, 0.8));
auto material_right = make_shared<Metal>(Color(0.8, 0.6, 0.2));

// 场景设定
HittableList world;
world.add(make_shared<Sphere>(Point3(0.0, -100.5, -1.0), 100.0, material_ground));
world.add(make_shared<Sphere>(Point3(0.0, 0.0, -1.2), 0.5, material_center));
world.add(make_shared<Sphere>(Point3(-1.0, 0.0, -1.0), 0.5, material_left));
world.add(make_shared<Sphere>(Point3(1.0, 0.0, -1.0), 0.5, material_right));
最终结果如下:
模糊反射
也能随机镜面反射的方向从而达到模糊反射的效果,在反射方向向量的末端生成一个以fuzz为半径的球,将球面上随机一点作为新的模糊反射方向。如下图:
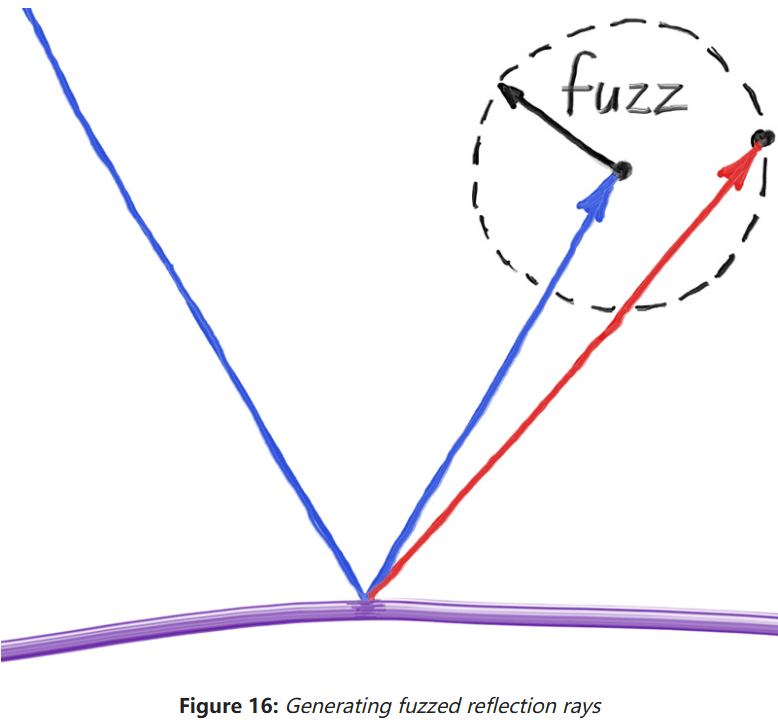
fuzz越大,最终反射结果就越模糊。此外:
- 反射光线须是单位向量,这样才有意义。
- 还有反射至物体内表面的可能,这时我们直接认为这束光被物体吸收了即可。
修改Metal类,让它支持模糊反射:
class Metal : public Material
{
public:
    Metal(const Color& albedo, double fuzz) : albedo(albedo), fuzz(fuzz < 1 ? fuzz : 1) {}

    bool scatter(const Ray& r_in, const HitRecord& rec, Color& attenuation, Ray& scattered) const
    {
        Vec3 reflected_direction = reflect(r_in.direction(), rec.normal);
        reflected_direction = unitVector(reflected_direction) + (fuzz * random_unit_vector());
        scattered = Ray(rec.position, reflected_direction);
        attenuation = albedo;
        return (dot(scattered.direction(), rec.normal) > 0);
    }

private:
    Color albedo;
    double fuzz;
};
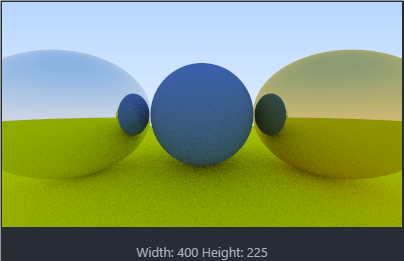
然后将左边球的模糊度调成0.3,右边调成1看看:
介质材质
像水、玻璃、钻石等透明材质统称为介质(dielectrics)。当光打到它们,会产生反射和折射光线,我们将会随机处理这两种光线,在着色点只产生一条反射/折射光线。折射光线的量取决于折射率。例如玻璃的折射率通常是1.5~1.7,钻石约2.4,空气为1.000293。
计算折射光
折射可由斯涅尔定律(Snell's Law)描述:
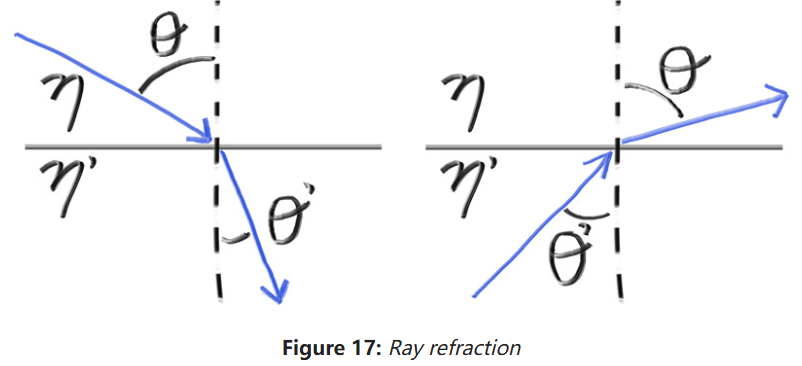
为了决定折射光的方向,需要计算出:
在折射面有折射光线,法线以及折射角。可以将折射光线分解为平行法线的和垂直法线的两个分量:
两个分量的计算方式如下:
如果我们限制入射光线和入射表面法向量是单位向量,那么有
那么就能重写成:
知道如何计算折射光后,就能开始写代码了。在Vec3类中添加如下工具函数:
// 利用斯涅尔定律计算反射光线
inline Vec3 refract(const Vec3& v, const Vec3& n, double etaI_div_etaR)
{
    double cos_theta = std::fmin(dot(-v, n), 1.0);
    Vec3 r_out_perp = etaI_div_etaR * (v + cos_theta * n);
    Vec3 r_out_parallel = -std::sqrt(std::fabs(1.0 - r_out_perp.lengthSquared())) * n;
    return r_out_perp + r_out_parallel;
}
然后就能新建Dielectric材质类了:
#pragma once

#include "material.hpp"

class Dielectric : public Material
{
public:
    Dielectric(double refraction_index) : refraction_index(refraction_index) {}

    bool scatter(const Ray& r_in, const HitRecord& rec, Color& attenuation, Ray& scattered) const override
    {
        attenuation = Color(1.0, 1.0, 1.0);
        double ri = rec.front_face ? (1.0 / refraction_index) : refraction_index;

        Vec3 unit_direction = unitVector(r_in.direction());
        Vec3 refracted = refract(unit_direction, rec.normal, ri);

        scattered = Ray(rec.position, refracted);
        return true;
    }

private:
    double refraction_index;
};
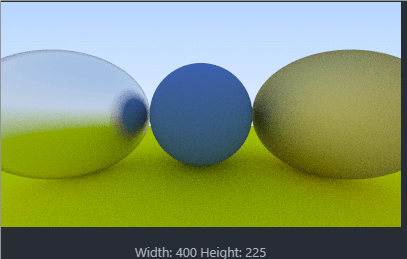
然后修改左边的球为玻璃材质的,看看效果:
全反射
当入射光线角度超过临界角时会发生全反射(Total Internal Reflection),可以根据斯涅尔定律判断发生全反射的条件:
if (ri * sin_theta > 1.0)
{
    // 必须全反射
}
else
{
    // 可以折射
}
可以通过三角学公式计算sin_theta:
其中
接下来在Dielectric类中应用有关全反射的修改:
bool scatter(const Ray& r_in, const HitRecord& rec, Color& attenuation, Ray& scattered) const override
{
    attenuation = Color(1.0, 1.0, 1.0);
    double ri = rec.front_face ? (1.0 / refraction_index) : refraction_index;

    Vec3 unit_direction = unitVector(r_in.direction());
    double cos_theta = std::fmin(dot(-unit_direction, rec.normal), 1.0);
    double sin_theta = std::sqrt(1.0 - cos_theta * cos_theta);

    bool cannot_refract = ri * sin_theta > 1.0;
    Vec3 direction;
    if (cannot_refract)
    {
        direction = reflect(unit_direction, rec.normal);
    }
    else
    {
        direction = refract(unit_direction, rec.normal, ri);
    }

    scattered = Ray(rec.position, direction);
    return true;
}
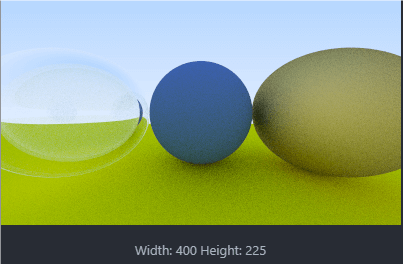
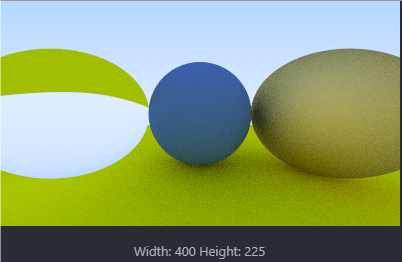
为了体现出全反射的效果,在这里将世界的介质视为水(反射率1.33),球的材质视为空气(反射率1),那么初始化的反射率就是1.00 / 1.33。最终成果如下:
可以发现这个空气泡泡有时候反射,有时候折射。
菲涅尔?Schlick!
为了让介质材质的结果变得更真实,引入菲涅尔方程,它描述了光线经过两个介质的界面时,反射和透射的光强比重。但菲涅尔方程计算十分复杂,这里使用Schlick近似来近似计算菲涅尔方程。
bool scatter(const Ray& r_in, const HitRecord& rec, Color& attenuation, Ray& scattered) const override
{
    attenuation = Color(1.0, 1.0, 1.0);
    double ri = rec.front_face ? (1.0 / refraction_index) : refraction_index;

    Vec3 unit_direction = unitVector(r_in.direction());
    double cos_theta = std::fmin(dot(-unit_direction, rec.normal), 1.0);
    double sin_theta = std::sqrt(1.0 - cos_theta * cos_theta);

    bool cannot_refract = ri * sin_theta > 1.0;
    Vec3 direction;
    if (cannot_refract || reflectance(cos_theta, ri) > random_double())
    {
        direction = reflect(unit_direction, rec.normal);
    }
    else
    {
        direction = refract(unit_direction, rec.normal, ri);
    }

    scattered = Ray(rec.position, direction);
    return true;
}

static double reflectance(double cosine, double refraction_index)
{
    // 使用 Schlick 近似简化计算
    double r0 = (1 - refraction_index) / (1 + refraction_index);
    r0 = r0 * r0;
    return r0 + (1 - r0) * std::pow((1 - cosine), 5);
}
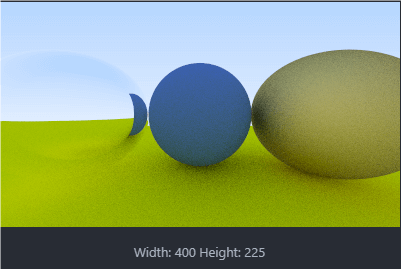
最后修改左边的球,让它成为中空玻璃球(往里面再套一个玻璃球):
// 材质设定
auto material_ground = make_shared<Lambertian>(Color(0.8, 0.8, 0.0));
auto material_center = make_shared<Lambertian>(Color(0.1, 0.2, 0.5));
auto material_left = make_shared<Dielectric>(1.50);
auto material_bubble = make_shared<Dielectric>(1.00 / 1.50);
auto material_right = make_shared<Metal>(Color(0.8, 0.6, 0.2), 1.0);

// 场景设定
HittableList world;
world.add(make_shared<Sphere>(Point3(0.0, -100.5, -1.0), 100.0, material_ground));
world.add(make_shared<Sphere>(Point3(0.0, 0.0, -1.2), 0.5, material_center));
world.add(make_shared<Sphere>(Point3(-1.0, 0.0, -1.0), 0.5, material_left));
world.add(make_shared<Sphere>(Point3(-1.0, 0.0, -1.0), 0.4, material_bubble));
world.add(make_shared<Sphere>(Point3(1.0, 0.0, -1.0), 0.5, material_right));
结果如下: