6 - 下周的光追Part3
开始学习大名鼎鼎的光追三部曲系列中的:Ray Tracing: The Next Week!希望我能坚持下去吧。
四边形
接下来我们将往项目中添加四边形图元。
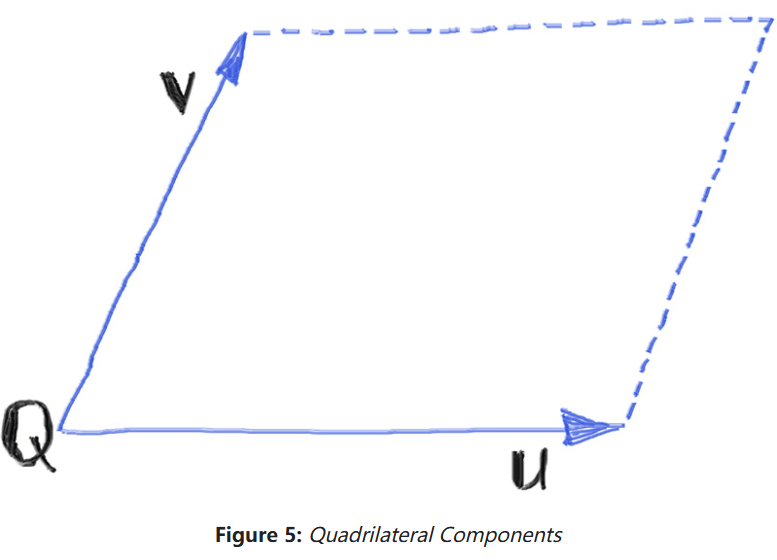
定义四边形
接下来看看四边形的定义,我们将用三个几何量去定义一个四边形:
- :四边形的一角。
- :代表一侧的向量。可通过得到和相邻的一角。
- :代表另一侧的向量。可通过得到和相邻的另一角。
和相对的角可通过得到。这些量都是三维的,尽管四边形自己是一个二维对象。
四边形是平的,因此它AABB的厚度为0(在XY/YZ/ZX平面上)。在光线求交计算时可能会出现数值问题,我们可以通过设置一个极小的厚度来避免这种情况。修改AABB类如下:
class AABB
{
public:
    ...
    // 创建一个区间分量为x, y, z的AABB
    AABB(const Interval& x, const Interval& y, const Interval& z)
        : x(x), y(y), z(z)
    {
        pad_to_minimums();
    }
    // 用两个点创建一个AABB
    AABB(const Point3& a, const Point3& b)
    {
        ...
        pad_to_minimums();
    }
    // 用三个点创建一个AABB
    AABB(const Point3& a, const Point3& b, const Point3& c)
    {
        ...
        pad_to_minimums();
    }
    ...

private:
    // 给包围盒设置极小的厚度
    void pad_to_minimums()
    {
        double delta = 0.0001;
        if (x.size() < delta)    x = x.expand(delta);
        if (y.size() < delta)    y = y.expand(delta);
        if (z.size() < delta)    z = z.expand(delta);
    }
};
准备好AABB后,就能编写四边形类Quad了:
class Quad : public Hittable
{
public:
    Quad(const Point3& Q, const Vec3& u, const Vec3& v, shared_ptr<Material> material)
        : Q(Q), u(u), v(v), material(material)
    {
        set_bounding_box();
    }

    // 为四个顶点计算包围盒
    virtual void set_bounding_box()
    {
        AABB bbox_diagonal1 = AABB(Q, Q + u + v);
        AABB bbox_diagonal2 = AABB(Q + u, Q + v);
        bbox = AABB(bbox_diagonal1, bbox_diagonal2);
    }

    bool hit(const Ray& r, Interval ray_t, HitRecord& rec) const override
    {
        // todo
        return false;
    }

private:
    Point3 Q;
    Vec3 u, v;
    shared_ptr<Material> material;
    AABB bbox;
};
光线与四边形求交
光线与四边形求交需要经历三个步骤:
- 找到包含四边形的平面;
- 光线和四边形所在平面的求交;
- 查看交点是否在四边形内部。
我们先看看第二步,光线和平面的求交。类似光线和球面相交,这里给出平面的定义:
其中是常量,是平面上任一点。还可将平面的定义写成这样的形式,方便后续计算:
给定平面的法向量,从原点到平面上任意点的位置向量,那么可由上面的式子得到,通过点乘:
将光线代入,有:
求解,得到:
这个就是光线和平面的交点,如果光线和平面平行,将为0。对于四边形来说,这可以被立马判定为不相交。而对于其他平面图元,如果小于容忍值,也会判定为不相交。
判断光线和平面求交的方法同样适用于其他平面图元,如三角形,圆盘等。
找到包含四边形的平面
接下来看看第一步,找到包含四边形的平面方程。给定四边形的几何量,想要得到包含四边形的平面方程。
回想一下平面方程的定义,,其中是法向量。为了得到这个法向量,只需通过叉乘即可:
刚好在这个平面内,代入上面的点乘式子即可得到:
接下来我们将这些值写到Quad类中:
class Quad : public Hittable
{
public:
    Quad(const Point3& Q, const Vec3& u, const Vec3& v, shared_ptr<Material> material)
        : Q(Q), u(u), v(v), material(material)
    {
        Vec3 n = cross(u, v);
        normal = unitVector(n);
        D = dot(normal, Q);

        set_bounding_box();
    }
    ...

private:
    Point3 Q;
    Vec3 u, v;
    shared_ptr<Material> material;
    AABB bbox;
    Vec3 normal;
    double D;
};
可以实现针对无限大四边形的hit()函数了:
bool hit(const Ray& r, Interval ray_t, HitRecord& rec) const override
{
    double denom = dot(normal, r.direction());

    // 光线和平面平行, miss
    if (std::fabs(denom) < 1e-8)
    {
        return false;
    }

    // 求解t, 在范围外就返回false
    double t = (D - dot(normal, r.origin())) / denom;
    if (!ray_t.contains(t))
    {
        return false;
    }

    Point3 intersection = r.at(t);

    // 更新rec
    rec.t = t;
    rec.position = intersection;
    rec.material = material;
    rec.set_face_normal(r, normal);

    return true;
}
定位平面上的点
目前,相交点在包含四边形的平面上,但可能在四边形外部或内部。如果在四边形内部,就说明被击中了。为了知道相交点是否在四边形内部,且为了给它分配纹理坐标,我们需要定位平面上的相交点。
我们需要在平面上建系,如图:
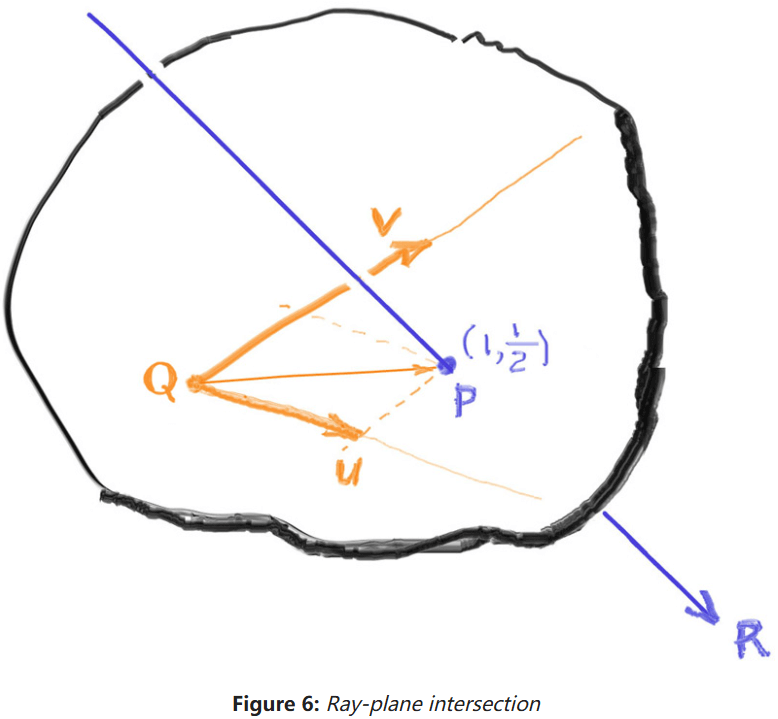
光线和平面相交,留下相交点(不是上面光线定义的P)。经测量,,也就是说在平面坐标系中的坐标为。
一般的,点可以被表示为:
而可由下列式子得出(推导详见原教程6.5小节):
其中,
是给定四边形的常量,可以先在代码中存储一下:
class Quad : public Hittable
{
public:
    Quad(const Point3& Q, const Vec3& u, const Vec3& v, shared_ptr<Material> material)
        : Q(Q), u(u), v(v), material(material)
    {
        Vec3 n = cross(u, v);
        normal = unitVector(n);
        D = dot(normal, Q);
        w = n / dot(n, n);

        set_bounding_box();
    }
    ...
private:
    Point3 Q;
    Vec3 u, v;
    Vec3 w;
    ...
};
相交点的UV坐标系内部测试
有了相交点在四边形所在平面的坐标,就能判断其是否在四边形内了。
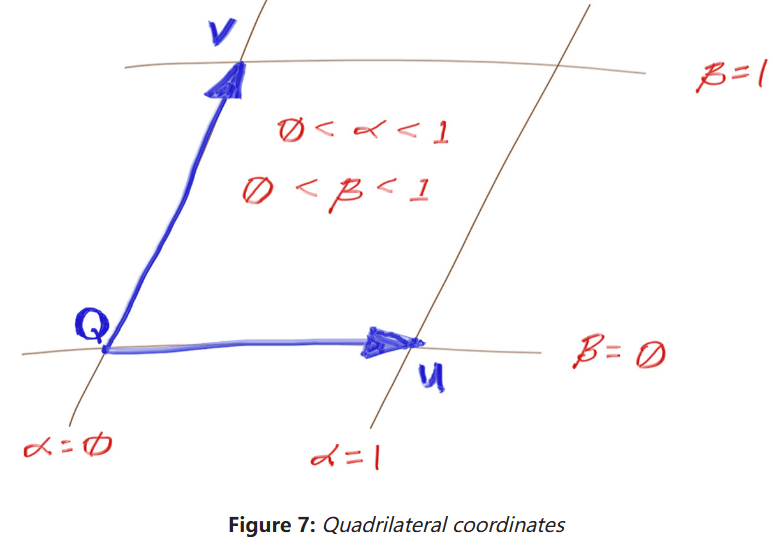
如图,判断相交点是否在四边形内,只需满足如下条件:
继续完善hit()如下:
bool hit(const Ray& r, Interval ray_t, HitRecord& rec) const override
{
    double denom = dot(normal, r.direction());

    // 光线和平面平行, miss
    if (std::fabs(denom) < 1e-8)
    {
        return false;
    }

    // 求解t, 在范围外就返回false
    double t = (D - dot(normal, r.origin())) / denom;
    if (!ray_t.contains(t))
    {
        return false;
    }

    // 相交点是否在四边形内
    Point3 intersection = r.at(t);
    Vec3 planar_hitpt_vector = intersection - Q;
    double alpha = dot(w, cross(planar_hitpt_vector, v));
    double beta = dot(w, cross(u, planar_hitpt_vector));
    if (!is_interior(alpha, beta, rec))
    {
        return false;
    }

    // 更新rec
    rec.t = t;
    rec.position = intersection;
    rec.material = material;
    rec.set_face_normal(r, normal);

    return true;
}

// 判断点是否在四边形内部
virtual bool is_interior(double a, double b, HitRecord& rec) const
{
    Interval unit_interval = Interval(0, 1);
    if (!unit_interval.contains(a) || !unit_interval.contains(b))
    {
        return false;
    }

    rec.u = a;
    rec.v = b;
    return true;
}
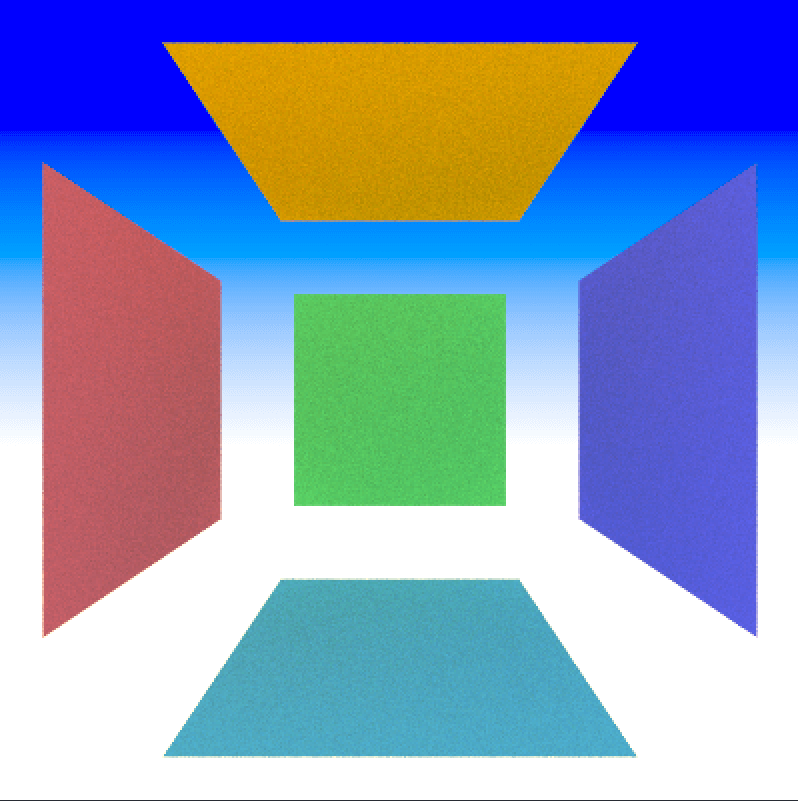
接下来新创一个场景看看:
void quadsScene(HittableList& world, Camera& cam)
{
    auto left_red = make_shared<Lambertian>(Color(1.0, 0.2, 0.2));
    auto back_green = make_shared<Lambertian>(Color(0.2, 1.0, 0.2));
    auto right_blue = make_shared<Lambertian>(Color(0.2, 0.2, 1.0));
    auto upper_orange = make_shared<Lambertian>(Color(1.0, 0.5, 0.0));
    auto lower_teal = make_shared<Lambertian>(Color(0.2, 0.8, 0.8));

    world.add(make_shared<Quad>(Point3(-3, -2, 5), Vec3(0, 0, -4), Vec3(0, 4, 0), left_red));
    world.add(make_shared<Quad>(Point3(-2, -2, 0), Vec3(4, 0, 0), Vec3(0, 4, 0), back_green));
    world.add(make_shared<Quad>(Point3(3, -2, 1), Vec3(0, 0, 4), Vec3(0, 4, 0), right_blue));
    world.add(make_shared<Quad>(Point3(-2, 3, 1), Vec3(4, 0, 0), Vec3(0, 0, 4), upper_orange));
    world.add(make_shared<Quad>(Point3(-2, -3, 5), Vec3(4, 0, 0), Vec3(0, 0, -4), lower_teal));

    cam.aspectRadio = 1.0;
    cam.imgWidth = 400;
    cam.samples_per_pixel = 100;
    cam.max_depth = 50;

    cam.vfov = 80;
    cam.lookFrom = Point3(0, 0, 9);
    cam.lookAt = Point3(0, 0, 0);
    cam.vup = Vec3(0, 1, 0);

    cam.defocus_angle = 0;
}
结果如下:
添加其他2D图元
可以举一反三添加其他2D图元了,例如半径为r的圆盘,is_interior()返回true的条件为sqrt(a * a + b * b) < r;例如三角形,条件是a > 0 && b > 0 && a + b < 1。更多图元(圆环等)详见教程仓库src/TheNextWeek/quad.h。
光源
光源是光线追踪的关键部分。早期简单的光追渲染器使用抽象光源,例如点光源,平行光。现代方法则使用更多基于物理的光源,有尺寸和位置属性。为了创建这些光源,我们需要将任一常规物体转化为场景中的光源。
自发光材质
首先让我们创建一个自发光材质DiffuseLight。需要添加一个自发光方程:
class DiffuseLight : public Material
{
public:
    DiffuseLight(shared_ptr<Texture> tex) : tex(tex) {}
    DiffuseLight(const Color& emit) : tex(make_shared<SolidColor>(emit)) {}

    Color emitted(double u, double v, const Point3& p) const override
    {
        return tex->value(u, v, p);
    }

private:
    shared_ptr<Texture> tex;
};
别忘了在父类Material中补充emitted():
virtual Color emitted(double u, double v, const Point3& p) const
{
    return Color(0, 0, 0);
}
给ray_color()添加背景色
接下来,我们想要一个纯黑的背景,以便只有光源在发光。需要修改一下Camera类:
class Camera
{
public:
    double aspectRadio = 1.0;            // 图像的宽高比
    int imgWidth = 100;                  // 图像宽度
    int samples_per_pixel = 10;          // 每像素采样数, 即SPP
    int max_depth = 10;                  // 光线的最大弹射次数
    Color background;                    // 场景的背景色
    ...

private:
    ...
    Color ray_color(const Ray& r, int depth, const Hittable& world) const
    {
        // 递归退出
        if (depth <= 0)
        {
            return Color(0, 0, 0);
        }

        // 光线没打中物体, 返回背景色
        HitRecord rec;
        if (!world.hit(r, Interval(0.001, infinity), rec))
        {
            return background;
        }

        // 光线打到物体, 看情况返回这条光线的颜色
        Ray scattered;
        Color attenuation;
        Color color_from_emission = rec.material->emitted(rec.u, rec.v, rec.position);

        if (!rec.material->scatter(r, rec, attenuation, scattered))
        {
            return color_from_emission;
        }
        Color color_from_scatter = attenuation * ray_color(scattered, depth - 1, world);

        return color_from_emission + color_from_scatter;
    }
};
别往了给之前的场景设定颜色,因为那些场景没有光源:
cam.background = Color(0.70, 0.80, 1.00);
将物体转换为光源
接下来将一个矩形设置为光源:
void simpleLightScene(HittableList& world, Camera& cam)
{
    auto perlin_tex = make_shared<NoiseTexture>(4);
    world.add(make_shared<Sphere>(Point3(0, -1000, 0), 1000, make_shared<Lambertian>(perlin_tex)));
    world.add(make_shared<Sphere>(Point3(0, 2, 0), 2, make_shared<Lambertian>(perlin_tex)));

    auto diffuse_light = make_shared<DiffuseLight>(Color(4, 4, 4));
    world.add(make_shared<Quad>(Point3(3, 1, -2), Vec3(2, 0, 0), Vec3(0, 2, 0), diffuse_light));

    cam.aspectRadio = 16.0 / 9.0;
    cam.imgWidth = 400;
    cam.samples_per_pixel = 100;
    cam.max_depth = 50;
    cam.background = Color(0, 0, 0);

    cam.vfov = 20;
    cam.lookFrom = Point3(26, 3, 6);
    cam.lookAt = Point3(0, 2, 0);
    cam.vup = Vec3(0, 1, 0);

    cam.defocus_angle = 0;
}
结果如下:
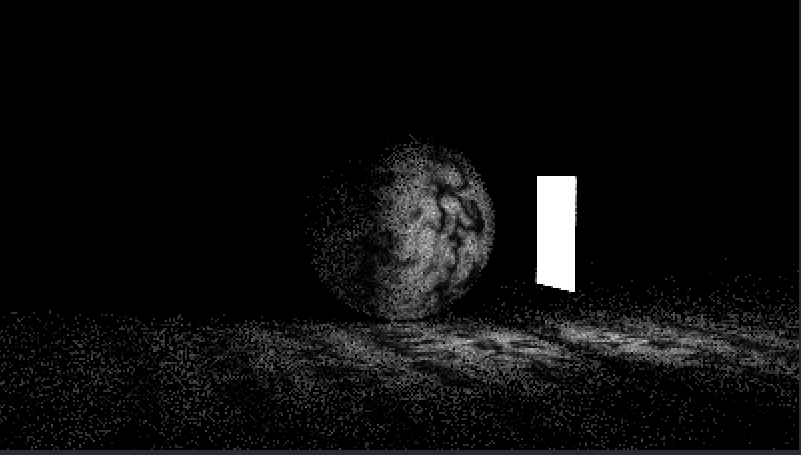
注意到光源比(1, 1, 1)亮,这允许它照亮场景。然后再加一个球体光源试试:
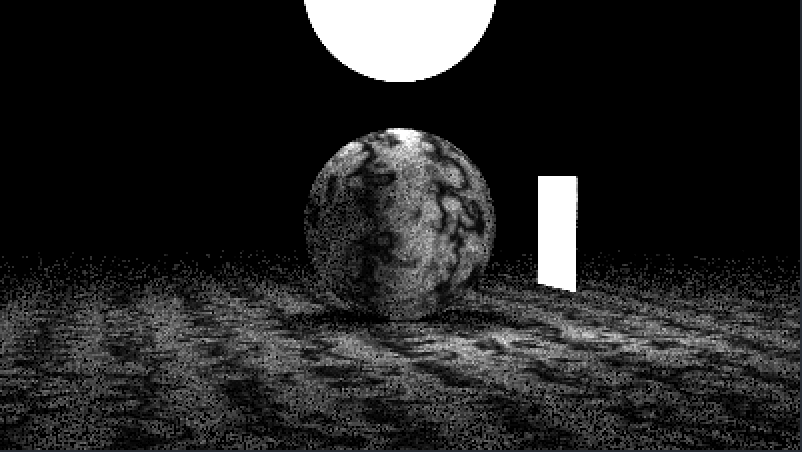
world.add(make_shared<Sphere>(Point3(0, 7, 0), 2, diffuse_light));
结果如下:
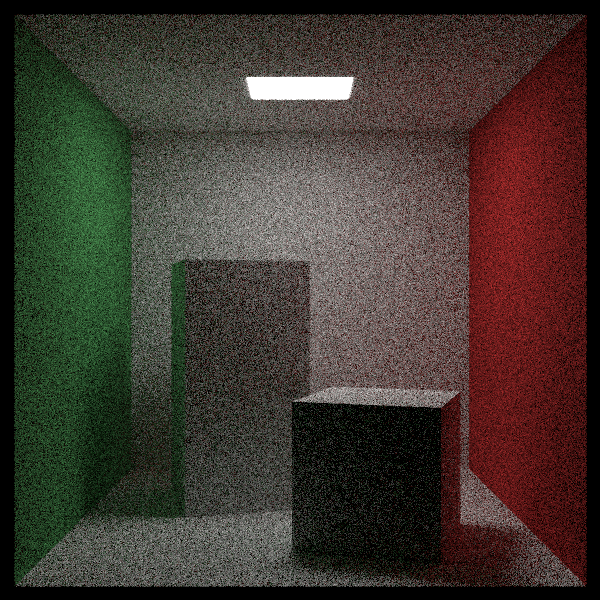
创建空的康奈尔盒场景
有了光源和四边形,就能创建经典的康奈尔盒子场景了:
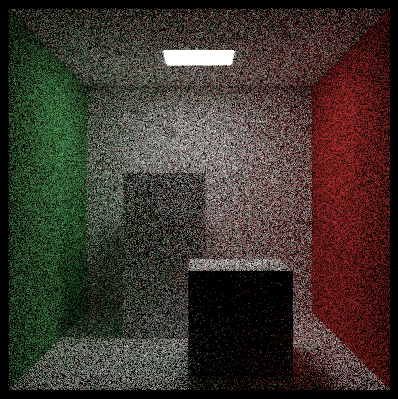
void cornellBoxScene(HittableList& world, Camera& cam)
{
    auto white = make_shared<Lambertian>(Color(0.73, 0.73, 0.73));
    auto red = make_shared<Lambertian>(Color(0.65, 0.05, 0.05));
    auto green = make_shared<Lambertian>(Color(0.12, 0.45, 0.15));
    auto light = make_shared<DiffuseLight>(Color(15, 15, 15));

    world.add(make_shared<Quad>(Point3(555, 0, 0), Vec3(0, 555, 0), Vec3(0, 0, 555), green));
    world.add(make_shared<Quad>(Point3(0, 0, 0), Vec3(0, 555, 0), Vec3(0, 0, 555), red));
    world.add(make_shared<Quad>(Point3(343, 554, 332), Vec3(-130, 0, 0), Vec3(0, 0, -105), light));
    world.add(make_shared<Quad>(Point3(0, 0, 0), Vec3(555, 0, 0), Vec3(0, 0, 555), white));
    world.add(make_shared<Quad>(Point3(555, 555, 555), Vec3(-555, 0, 0), Vec3(0, 0, -555), white));
    world.add(make_shared<Quad>(Point3(0, 0, 555), Vec3(555, 0, 0), Vec3(0, 555, 0), white));

    cam.aspectRadio = 1.0;
    cam.imgWidth = 600;
    cam.samples_per_pixel = 200;
    cam.max_depth = 50;
    cam.background = Color(0, 0, 0);

    cam.vfov = 40;
    cam.lookFrom = Point3(278, 278, -800);
    cam.lookAt = Point3(278, 278, 0);
    cam.vup = Vec3(0, 1, 0);

    cam.defocus_angle = 0;
}
结果如下:

图片噪点非常多是因为光源太小了,所以大多数随机光线都没打到光源再反弹。
场景实例
康奈尔盒场景还有两个方块,它们相对墙面是被旋转过的。首先,先实现一个创建盒子的函数,通过创建包含6个矩形的HittableList:
// Quad.hpp
// 返回由两个点确定的3D盒子
inline shared_ptr<HittableList> box(const Point3& a, const Point3& b, shared_ptr<Material> material)
{
    auto sides = make_shared<HittableList>();

    Point3 min = Point3(std::fmin(a.x(), b.x()), std::fmin(a.y(), b.y()), std::fmin(a.z(), b.z()));
    Point3 max = Point3(std::fmax(a.x(), b.x()), std::fmax(a.y(), b.y()), std::fmax(a.z(), b.z()));
    Vec3 dx = Vec3(max.x() - min.x(), 0, 0);
    Vec3 dy = Vec3(0, max.y() - min.y(), 0);
    Vec3 dz = Vec3(0, 0, max.z() - min.z());
    sides->add(make_shared<Quad>(Point3(min.x(), min.y(), max.z()), dx, dy, material));    // 前
    sides->add(make_shared<Quad>(Point3(max.x(), min.y(), max.z()), -dz, dy, material));    // 右
    sides->add(make_shared<Quad>(Point3(max.x(), min.y(), min.z()), -dx, dy, material));    // 后
    sides->add(make_shared<Quad>(Point3(min.x(), min.y(), min.z()), dz, dy, material));    // 左
    sides->add(make_shared<Quad>(Point3(min.x(), max.y(), max.z()), dx, -dz, material));    // 上
    sides->add(make_shared<Quad>(Point3(min.x(), min.y(), min.z()), dx, dz, material));    // 下

    return sides;
}
然后在场景中添加盒子:
world.add(box(Point3(130, 0, 65), Point3(295, 165, 230), white));
world.add(box(Point3(265, 0, 295), Point3(430, 330, 460), white));
结果如下:
有了盒子后,接下来要将它们旋转。在光线追踪中,这通常由实例完成。实例是场景中几何图元的拷贝,同图元的每个实例都是独立的,这意味着对一个实例进行平移和旋转不会影响其他实例。
实例的平移
在光线追踪中,平移物体不如平移光线。例如下图将粉盒子向右平移得到黑盒子:
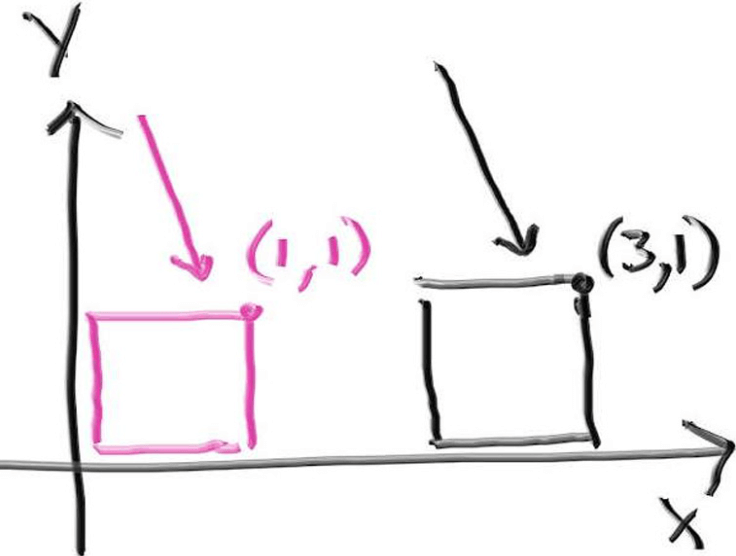
与其让盒子向右移动,不如让光线向左移动,这样盒子就“相对向右移动”了,和摄像机实现移动的原理一样。但还需要注意的是,相交点是和盒子一起移动的,因此如果向左移动后的光线仍打到盒子,就让相交点向右移动。
实现平移的类Translate如下:
class Translate : public Hittable
{
public:
    Translate(shared_ptr<Hittable> object, const Vec3& offset)
        : object(object), offset(offset)
    {
        bbox = object->bounding_box() + offset;
    }

    bool hit(const Ray& r, Interval ray_t, HitRecord& rec) const override
    {
        // 让光反向移动, 以实现物体移动的效果
        Ray offset_r(r.origin() - offset, r.direction(), r.time());

        // 移动后的光是否打到物体, 是的话就让相交点正向移动
        if (!object->hit(offset_r, ray_t, rec))
        {
            return false;
        }
        rec.position += offset;
        return true;
    }

    AABB bounding_box() const override { return bbox; }

private:
    shared_ptr<Hittable> object;
    Vec3 offset;
    AABB bbox;
};
别忘了重载AABB类和Interval类的运算符:
// aabb.hpp
...
const AABB AABB::empty = AABB(Interval::empty, Interval::empty, Interval::empty);
const AABB AABB::universe = AABB(Interval::universe, Interval::universe, Interval::universe);

inline AABB operator+(const AABB& bbox, const Vec3& offset)
{
    return AABB(bbox.x + offset.x(), bbox.y + offset.y(), bbox.z + offset.z());
}

inline AABB operator+(const Vec3& offset, const AABB& bbox)
{
    return bbox + offset;
}
// interval.hpp
...
const Interval Interval::empty = Interval(+infinity, -infinity);
const Interval Interval::universe = Interval(-infinity, +infinity);

inline Interval operator+(const Interval& ival, double displacement)
{
    return Interval(ival.min + displacement, ival.max + displacement);
}

inline Interval operator+(double displacement, const Interval& ival)
{
    return ival + displacement;
}
实例的旋转
直接给出绕轴逆时针旋转的公式:
绕X轴逆时针旋转:
绕Y轴逆时针旋转:
绕Z轴逆时针旋转:
在之前的平移中,我们按照如下想法实现了平移实例类:
- 将光线逆向移动
offset; - 移动后的光线是否和物体相交;
- 是的话就将相交点正向移动
offset。
这种想法实际上就是改变坐标系:
- 将光线从世界坐标系转换到物体的模型坐标系;
- 在模型坐标系中,光线是否和物体相交;
- 是的话就将相交点从模型坐标系转换到世界坐标系。
也可以按这种思想去研究旋转这一情况。此外,旋转一个物体还将改变它表面的法线,也能通过上述公式去旋转法线。(但是缩放不是这样子的,如果要实现缩放还需研究表面法线变换。)
实现旋转的类Rotate如下:
enum class RotateAxis { X, Y, Z };

class Rotate : public Hittable
{
public:
    Rotate(shared_ptr<Hittable> object, RotateAxis axis, double angle)
    : object(object), axis(axis), angle(angle)
    {
        bbox = object->bounding_box();

        // 利用线性插值找旋转后的bbox
        Point3 min(infinity, infinity, infinity);
        Point3 max(-infinity, -infinity, -infinity);

        for (int i = 0; i < 2; ++i)
        {
            for (int j = 0; j < 2; ++j)
            {
                for (int k = 0; k < 2; ++k)
                {
                    double x = i * bbox.x.max + (1 - i) * bbox.x.min;
                    double y = j * bbox.y.max + (1 - j) * bbox.y.min;
                    double z = k * bbox.z.max + (1 - k) * bbox.z.min;

                    Vec3 tester = rotate(Vec3(x, y, z), axis);
                    for (int c = 0; c < 3; ++c)
                    {
                        min[c] = std::fmin(min[c], tester[c]);
                        max[c] = std::fmax(max[c], tester[c]);
                    }
                }
            }
        }

        bbox = AABB(min, max);
    }

    bool hit(const Ray& r, Interval ray_t, HitRecord& rec) const override
    {
        // 首先逆向旋转光线, 将光线从世界坐标系转换为模型坐标系
        Point3 origin = rotate(r.origin(), axis, false);
        Vec3 direction = rotate(r.direction(), axis, false);
        Ray rotated_r(origin, direction, r.time());

        // 在模型坐标系中, 光线是否和物体相交
        if (!object->hit(rotated_r, ray_t, rec))
        {
            return false;
        }

        // 是的话就将正向旋转相交点和法线, 从模型坐标系转换到世界坐标系
        rec.position = rotate(rec.position, axis);
        rec.normal = rotate(rec.normal, axis);

        return true;
    }

    AABB bounding_box() const override { return bbox; }

private:
    shared_ptr<Hittable> object;
    RotateAxis axis;
    double angle;
    AABB bbox;

    // 默认按逆时针旋转向量Vec
    Vec3 rotate(const Vec3& vec, RotateAxis axis, bool is_ccw = true) const
    {
        double radians = degrees_to_radians(angle);
        if (!is_ccw)
        {
            radians = -radians;
        }
        double sin_theta = std::sin(radians);
        double cos_theta = std::cos(radians);

        Vec3 ret;
        if (axis == RotateAxis::X)
        {
            ret.e[0] = vec.x();
            ret.e[1] = (cos_theta * vec.y()) - (sin_theta * vec.z());
            ret.e[2] = (sin_theta * vec.y()) + (cos_theta * vec.z());
        }
        else if (axis == RotateAxis::Y)
        {
            ret.e[0] = (cos_theta * vec.x()) + (sin_theta * vec.z());
            ret.e[1] = vec.y();
            ret.e[2] = (-sin_theta * vec.x()) + (cos_theta * vec.z());
        }
        else if (axis == RotateAxis::Z)
        {
            ret.e[0] = (cos_theta * vec.x()) - (sin_theta * vec.y());
            ret.e[1] = (sin_theta * vec.x()) + (cos_theta * vec.y());
            ret.e[2] = vec.z();
        }

        return ret;
    }
};
然后调整下两个盒子:
shared_ptr<Hittable> box1 = box(Point3(0, 0, 0), Point3(165, 330, 165), white);
box1 = make_shared<Rotate>(box1, RotateAxis::Y, 15);
box1 = make_shared<Translate>(box1, Vec3(265, 0, 295));
world.add(box1);
shared_ptr<Hittable> box2 = box(Point3(0, 0, 0), Point3(165, 165, 165), white);
box2 = make_shared<Rotate>(box2, RotateAxis::Y, -18);
box2 = make_shared<Translate>(box2, Vec3(130, 0, 65));
world.add(box2);
最终结果如下: